
What is MongoDB and How to Create a MongoDB Account?
When building an application, we need a database to store and manage data. There are different types of databases available, and MongoDB is one of the popular NoSQL databases.
Before creating a MongoDB account, let's first understand what MongoDB is, why it is used, and then go through the account creation process step by step.
🍃 What is MongoDB?
MongoDB is a NoSQL database that stores data in a flexible, document-based format.
Unlike traditional relational databases, which store data in rows and columns, MongoDB stores data as documents.
Step 1: Go to the MongoDB Website
Open your browser and go to: https://www.mongodb.com/cloud/atlas/register
This takes you straight to the Atlas sign-up page.

Step 2: Create Your Account
You'll see a simple sign-up form. You have two easy options:
- Sign up with Google — fastest option, just click and choose your Google account
- Sign up with email — enter your email, create a password, and fill in your name

If using email, pick a password you'll remember — you'll need it every time you log back in.
Click Create Account (or the equivalent button) once you're done.
Step 3: Verify Your Email (If Needed)
If you signed up using email instead of Google, MongoDB sends a verification link to your inbox. Open the email and click the link to confirm your account.
Step 4: Answer a Few Quick Questions
MongoDB might ask you a couple of simple questions, like:
- What are you building?
- What's your experience level with databases?
- What programming language will you use?
These are just for MongoDB's own understanding — pick whatever feels closest to your situation. It doesn't affect your account setup.
Step 5: Create Your First Cluster (Free Tier)
A "cluster" is basically where your actual database lives. MongoDB will prompt you to create one.
Choose the Free (M0) tier — it costs nothing and is perfect for learning and small projects.
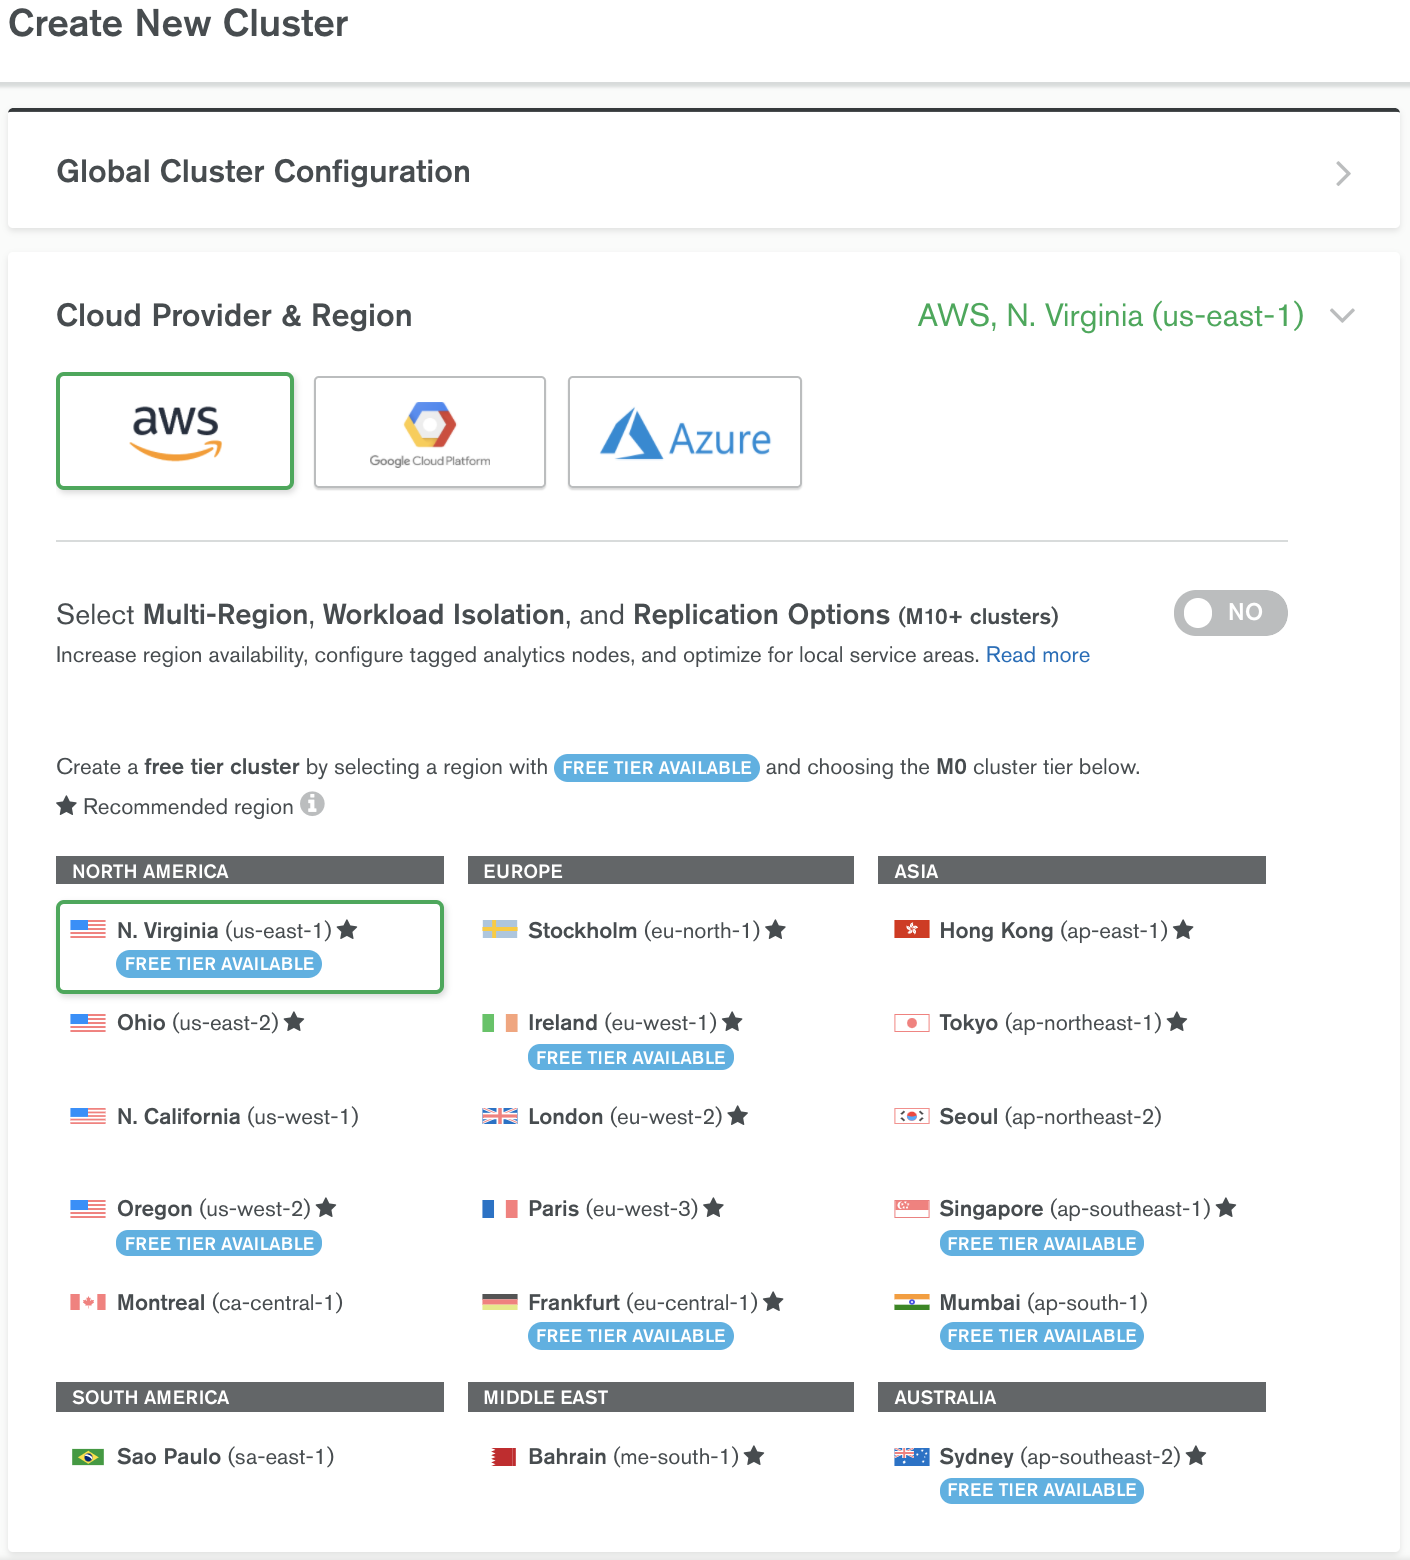
You'll also be asked to pick:
- A cloud provider (AWS, Google Cloud, or Azure — any of them work fine, AWS is the most common choice)
- A region — pick one close to your location for faster speed
Click Create or Create Deployment.
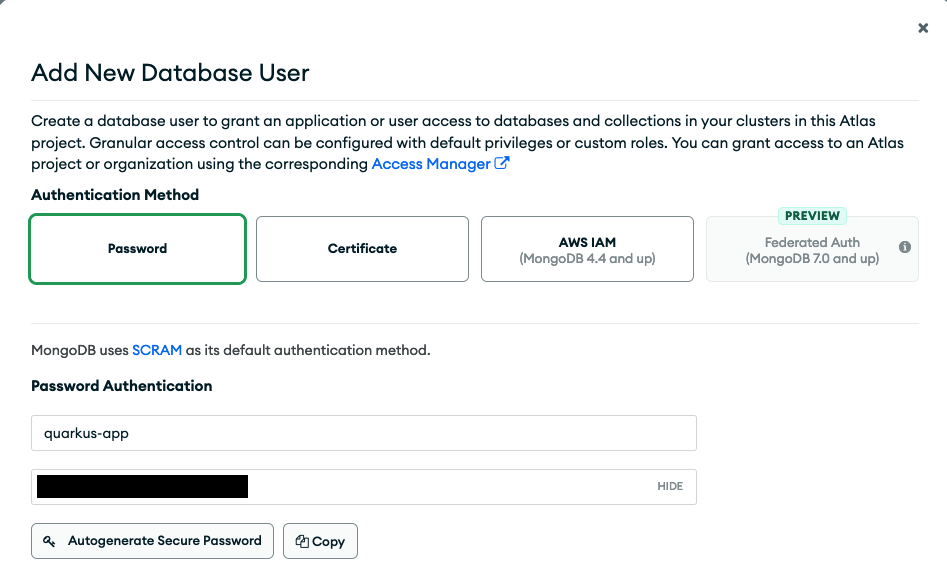
Step 6: Set Up a Database User
Before you can connect to your database, MongoDB asks you to create a username and password specifically for accessing your database (separate from your account login).
Write this username and password down somewhere safe — you'll need it whenever your app or tool connects to the database.
Step 7: Finish Setup
Click Finish and Close. MongoDB will take a minute or two to actually spin up your free cluster in the background.
Step 8: Verify It's Working
Once your cluster is ready, you'll see it listed on your Atlas dashboard. Click Connect, and MongoDB will show you a few ways to connect:
- MongoDB Compass — a visual tool to browse your data (great for beginners)
- Connection string — a code snippet you'd use in your app (Python, Node.js, etc.)
- MongoDB Shell — command-line access
For your first time, try Compass — download it, paste in the connection string MongoDB gives you, and you should see your empty database ready to use.
Common Problems and Fixes
- Can't connect to your cluster? Double-check you added your IP address (or "Allow from Anywhere") under Network Access.
- Forgot your database password? Go to Database Access in Atlas and reset it — this is separate from your MongoDB account password.
- Email verification not arriving? Check your spam folder, or click "Resend verification email" on the sign-up page.
Simple Takeaway
Creating a MongoDB account really comes down to: sign up → verify email → create a free cluster → set a database username/password → allow network access → connect using Compass. Once you see your empty cluster in Compass, you're fully set up and ready to start storing data.
Comments